
Learn how to eliminate dust orbs in photographs...
Orbs can be created by dust in front of the camera lens, so if one wants to capture real orbs by way of camera, we suggest taking some steps to get rid of dust orbs while investigating for real ghosts.
Because most digital cameras have a flush face with the flash unit being located beside the lens, dust is easily illuminated while photographing and is often captured in photos as balls of light - very orb-like indeed. Dust orbs can be eliminated, though, several different ways.
 How to Get Rid of Dust Orbs
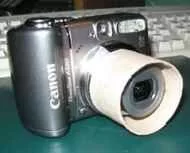
To reduce false orbs, one easy way is to simply purchase a more expensive camera that has a flash unit on top with a fixed lens that extends out from the camera body. Think old-style in camera appearance. We found that digital cameras that are bigger and bulkier seem to record less dust orbs in photographs (See photo of the Canon camera - a camera with an extended and fixed lens with a flash unit on top, that either attaches or "pops up", typically produces fewer dust orbs due to the distance between flash and lens. The further away the flash unit, the fewer the orbs). You could also try and disable the flash unit on your camera and move it away from the camera body if you are an electronics guru. Also, buying a lens hood that attaches to the end of that protruding camera lens would also work well. Check and see if a lens hood is available for your digital camera at a camera store.
 Of course, there is another option; and that is to make a lens hood out of paper or flexible (see cardboard tube example), thin plastic sheeting. Lens hoods can be expensive so downloading a hood to shield dust seems like a great way to experiment first. We found two websites that offer printable and free hoods you can fold and tape around your camera lens: Printable Lens Hoods.
 The other way we thought of to eliminate dust orbs is by blocking the flash from illuminating the lens area is to create an awning. This works particularly well for digital cameras that have a flush lens, or almost-flush lens. We created a .pdf file template which you can download and print: Dust Orb Awnings. The picture of the red and silver, point-and-shoot camera shows a yellow line indicating where to attach the dust awning to your camera to shield the lens from the flash unit on point-and-shoot models. This digital camera does not have an extended lens, so dust orbs will be even more prevalent.
Also check out: Reduce Dust Orbs for photos of our dust awning!
Simply, cut out the desired size dust awning and afix it to the camera body with some removable tape. The tabs may be shortened on the awning (or remove the ones you do not need to make the awning navigate its way around the top of the lens) to fit around your specific style of camera. Be careful to not have the awning get in front of the flash, or your photographs will have shadows in them that could be mistaken as a shadow ghost!
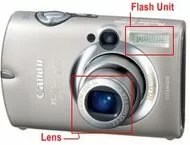 Image shows how close the flash unit can be to the lens. In this camera, the telescoping lens will reduce the amount of dust orbs. Point and shoot cameras have the flash unit beside the lens. Even though this lens telescopes a bit, it will still capture dust orbs. Perhaps a paper lens hood could be taped to the extended lens. In point-and-shoot models, the lack of a telescoping lens puts the flash on top of it, too close. And this set-up can make dust "light up" when the flash unit is used.
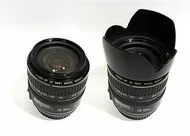 Last photograph: An example of a lens with, and without a lens hood. Adding a lens hood can reduce dust orbs.